ZerbuTabek
11 years agoRising Hotshot
Tutorial: Creating Custom Content Using Caster
For those of you who are still not sure how to use Caster, I bring you a step-by-step tutorial.
Caster does not:
- Read or write .package files, it merely edits images.
- Add stencils on top of images. You will need to take the image back into an image editor to do that.
This tutorial assumes you're familiar with cloning content and replacing DDS textures. If not, you may need to familiarize yourself with that process.
Setting Up
You will need:
- Caster itself obviously, you can get the tool and information about it here: http://forums.thesims.com/en_US/discussion/769014/caster-create-a-style-like-custom-content-creation-tool-update-swatch-image-and-resize/p1
- A folder to store base DDS files, these will be explained later.
- A folder to store patterns you want to apply to content using Caster.
- Patterns to apply to content, place these in the patterns folder. These are usually in PNG format, but any format supported by Windows Forms is acceptable.
Once you've set up your folders, and saved some patterns to your patterns folder, continue the tutorial.
When you first launch Caster, it will look like this.

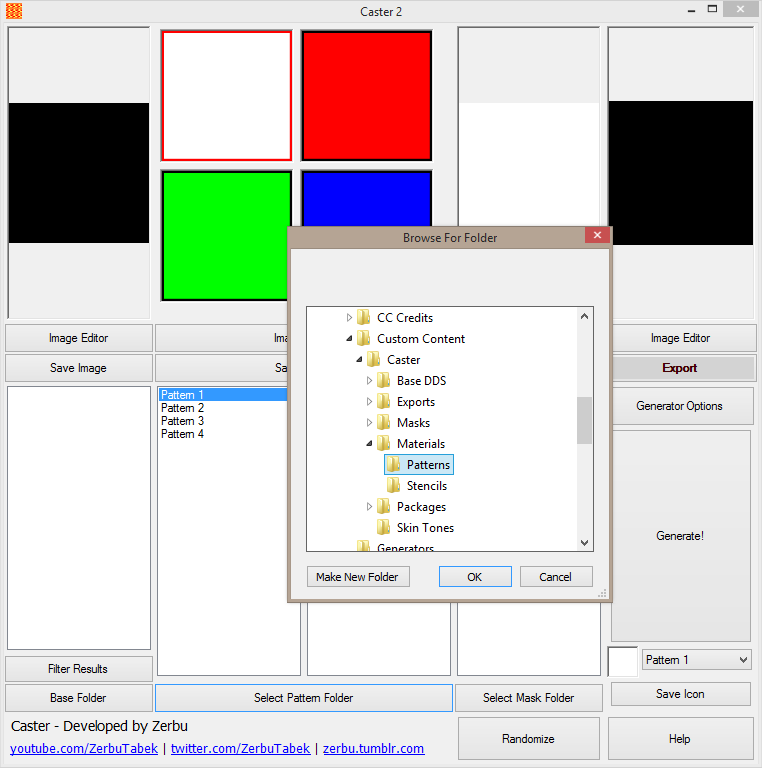
Select "Base Folder" then choose the folder you created for base images:

Do the same thing with the patterns folder:

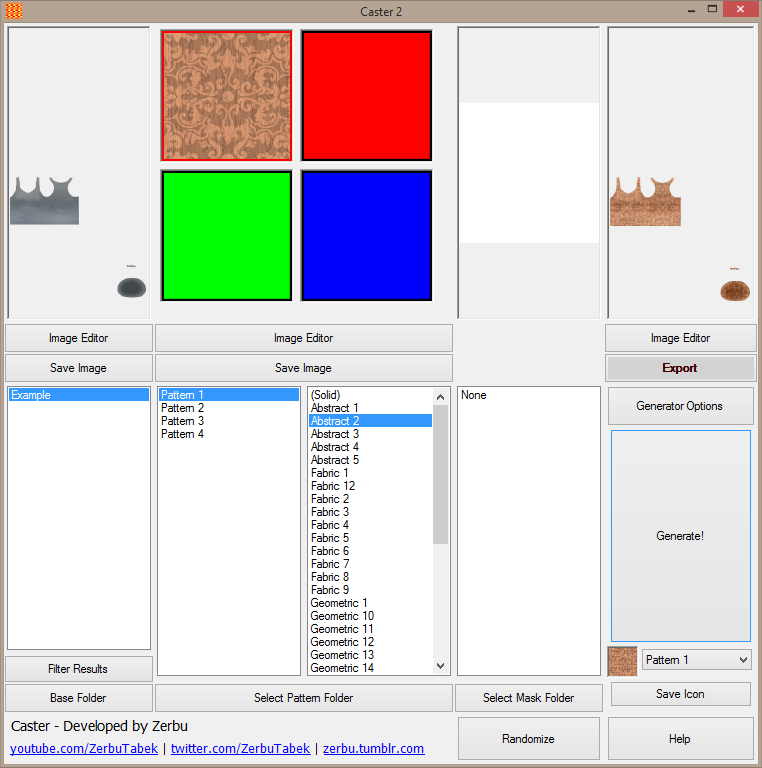
If you've been following the tutorial properly, you should get something like this:

You'll notice the area where base images appear is still empty. This is because we haven't exported the base image yet. This will be covered in the next section.
The folders you choose will be remembered the next time you open Caster, so there's no need to keep selecting them every time.
Exporting Base Images
1. Clone the CAS part (or other content, if you're reading this in the future) you want to add a pattern to. For the best results, you will need to choose a part that doesn't already contain a pattern or stencil.
2. Export the base DDS file from the cloned package into the folder you chose as the base image folder. If you've made CC before, you should know how to export.

Note: The list of base images will not update automatically. To update, click "Base Folder" again then immediately click OK.
Caster should then look like this:

Once you add more bases to to the folder, you can select between them using the drop down menu.
Applying the Pattern, and Exporting
By default, only "Pattern 1" will have any effect. The other three patterns can be applied using a "Mask" image to tell the program what areas to apply each pattern to. This is for advanced users though, so this tutorial will focus on applying one pattern to the whole image. I might make a tutorial on masks some other time.
Select the pattern you want from the drop down menu:

Click "Generate" and wait a few seconds. The preview at the right side will then update, with the pattern layered over it.

After that, simply click "Export", choose a folder to save in, and then replace the DDS file of the cloned package using S4PE.
The newest version of Caster also generates a 32x32 icon that you can use for the swatch. Click "Save Icon" to save that, and replace the swatch in S4PE.
Caster does not:
- Read or write .package files, it merely edits images.
- Add stencils on top of images. You will need to take the image back into an image editor to do that.
This tutorial assumes you're familiar with cloning content and replacing DDS textures. If not, you may need to familiarize yourself with that process.
Setting Up
You will need:
- Caster itself obviously, you can get the tool and information about it here: http://forums.thesims.com/en_US/discussion/769014/caster-create-a-style-like-custom-content-creation-tool-update-swatch-image-and-resize/p1
- A folder to store base DDS files, these will be explained later.
- A folder to store patterns you want to apply to content using Caster.
- Patterns to apply to content, place these in the patterns folder. These are usually in PNG format, but any format supported by Windows Forms is acceptable.
Once you've set up your folders, and saved some patterns to your patterns folder, continue the tutorial.
When you first launch Caster, it will look like this.

Select "Base Folder" then choose the folder you created for base images:

Do the same thing with the patterns folder:

If you've been following the tutorial properly, you should get something like this:

You'll notice the area where base images appear is still empty. This is because we haven't exported the base image yet. This will be covered in the next section.
The folders you choose will be remembered the next time you open Caster, so there's no need to keep selecting them every time.
Exporting Base Images
1. Clone the CAS part (or other content, if you're reading this in the future) you want to add a pattern to. For the best results, you will need to choose a part that doesn't already contain a pattern or stencil.
2. Export the base DDS file from the cloned package into the folder you chose as the base image folder. If you've made CC before, you should know how to export.

Note: The list of base images will not update automatically. To update, click "Base Folder" again then immediately click OK.
Caster should then look like this:

Once you add more bases to to the folder, you can select between them using the drop down menu.
Applying the Pattern, and Exporting
By default, only "Pattern 1" will have any effect. The other three patterns can be applied using a "Mask" image to tell the program what areas to apply each pattern to. This is for advanced users though, so this tutorial will focus on applying one pattern to the whole image. I might make a tutorial on masks some other time.
Select the pattern you want from the drop down menu:

Click "Generate" and wait a few seconds. The preview at the right side will then update, with the pattern layered over it.

After that, simply click "Export", choose a folder to save in, and then replace the DDS file of the cloned package using S4PE.
The newest version of Caster also generates a 32x32 icon that you can use for the swatch. Click "Save Icon" to save that, and replace the swatch in S4PE.