15 years ago
Tutorial - How to create a world using Real-World Height data
Following a request I had on my World thread - (http://forum.thesims3.com/jforum/posts/list/247320.page ) here is a tutorial on how to create a world in CAW using actual real height data that is readily available for most of the world. The data we will use is in the form of DEM data (Digital Elevation Model), more information on DEM data can be found at wikipedia - http://en.wikipedia.org/wiki/Digital_elevation_model
To get started you will need the following:
* Google Earth (http://earth.google.com)
* MicroDem (http://www.usna.edu/Users/oceano/pguth/website/microdem/microdem.htm)
* SRTM Overlay for GoogleEarth (Run from URL once you've installed Google Earth - http://www.ambiotek.com/topoview).
* A graphics program, such as Photoshop, Paintshop Pro, etc.. to covert a TIF to PNG. I will primarily be using Photoshop in this tutorial.
OK, before we start, make sure you've installed Google Earth, the SRTM Overlay & Microdem.
1st Step: Google Earth
The first time you use the SRTM overlay you will need to run the actual file, just double click on the file named srtm41.kmz (or right click and select open), this will load SRTM into Google Earth and place it in your 'Temporary Places' within the Places categories list. Put a tick in the option marked 'Elevation' under the STRM4.1 Category and you should see a load of boxes appear over the globe, each with a green dot in the middle.
Now, locate the area you want to create a height map for, in this example I'm going to use the lovely Greek island of Kefallonia.
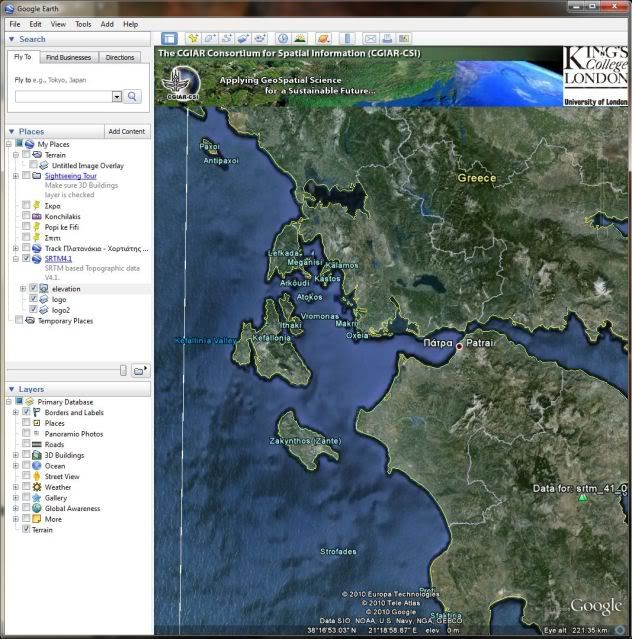
Ok, on the pic above you will see the island and part of mainland Greece, you will notice a green triangle towards the right side of the map labelled 'Data for: srtm_41_05', this is the DEM data we require.
Click on the green triangle and you will get a page pop up, scroll that page down until you can see the link 'Click here to visualise terrain and access 1 degree tiles'. Google earth will then split the larger box into smaller boxes and the display will change to a coloured height map view, in the 'Places' category list on the left you will see an additional selection called 'Elevation Preview', click on the plus next to this selection and then place a tick in the 'Global Legend' box (you might need to click twice).
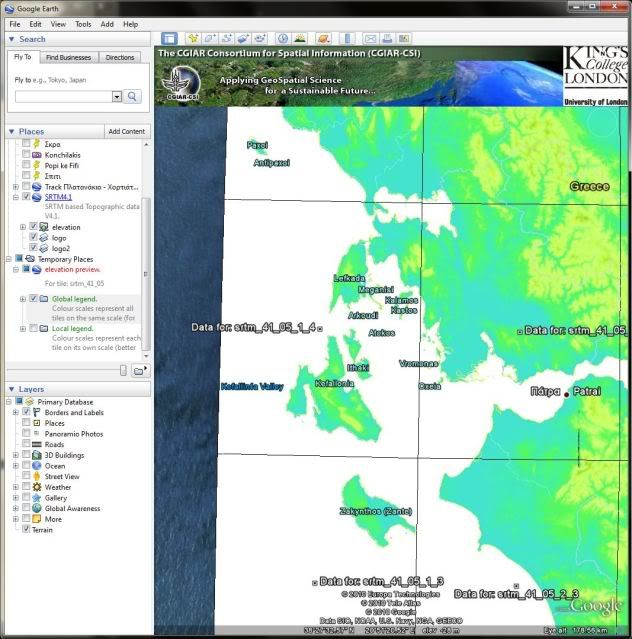
From the Google Earth screen we can now select the relevant data we want to download, click on the small box next to the data you want to download, for example I need to download srtm_41_05_1_4, a pop up box will appear and allow you to download the required file (I have had problems with using the FTP link so I normally select the HTTP one). Once you have downloaded the file you will need to un-ZIP it into C\mapdata\dems, once you have done that you can close Google Earth as you don't need it anymore.
2nd Step: MicroDEM
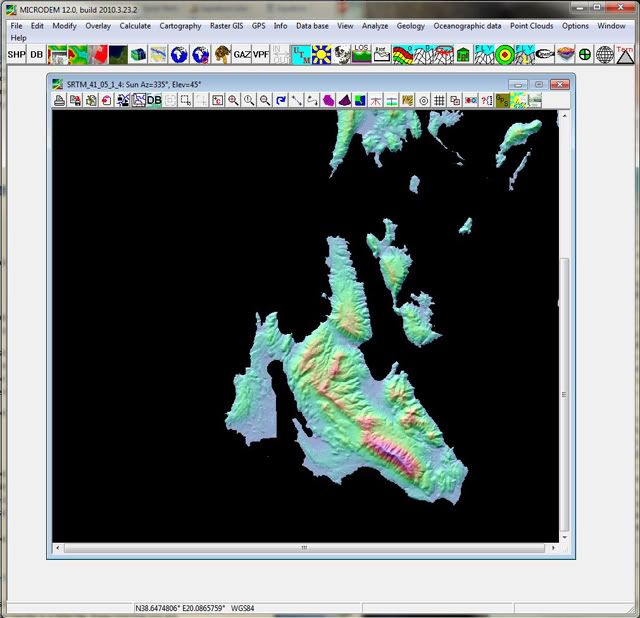
Open MicroDEM and then click File->Open DEM, in the Files of Type box make sure 'ASCII Arc Grid' is selected, browse to the folder you unzipped the DEM file, select the file and then click Open.
By default you get all the legends and other stuff you don't need, to turn these off. You'll only need to do this the first time, as it remembers these settings. Right click on the map & select 'Legends / Marginalia'. Click on 'Scale Bar' and untick the 'Include on Maps' box. Do the same with the Elevations button. Then click OK to close the Map Marginalia window.
The DEM files that we downloaded are too detailed for what we require so we need to 'thin' them, to do this select Raster GIS->Thin DEM (Decimate), select a Thin Factor of 3 and press ok. We now need to select the area that we want to use, on the toolbar of the Map window (not the main MicroDEM toolbar) you will see a button which has a dotted rectangle with an arrow at the bottom right (9th in from the left). This is the 'Create Subset' button, click it and then click and drag (whilst still holding the mouse button down) across the map area, try to keep the selection as square as possible.
Microdem will automatically zoom into the cropped area. If you made a mistake and cropped off an area you want, simply undo the crop (the crop operation is called a subset), by clicking the 'undo subset' button (to the right of the create subset button).
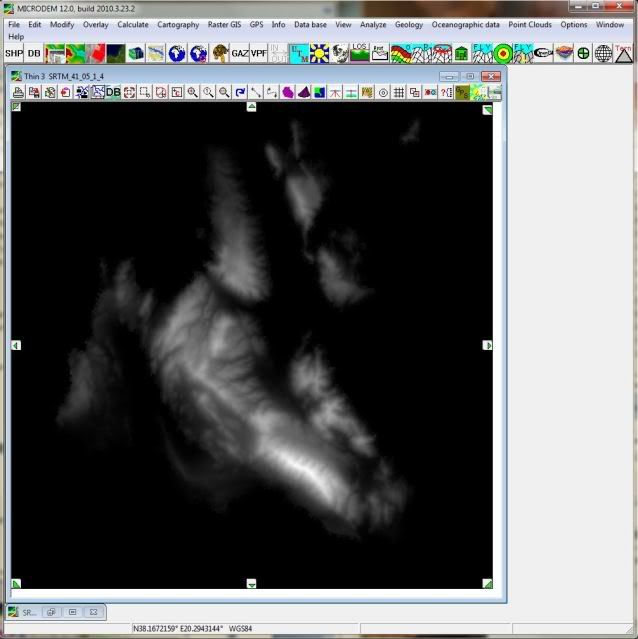
Next, we need to change the colour map to a greyscale map. Right click on the map and select 'Display Parameter' and then select 'Elevation'. Select the Greyscale option in the list and then click on the Z Range button. The Z Range basically controls how the heights are mapped onto the greyscale colours, the greater the height, the lighter the colour.
I usually leave the default values but if you have a problem with the map in CAW you can try altering the values, especially if the sea level seems wrong you can lower the Min Value to give more depth. Click OK and Ok again and MicroDEM will convert the map into a greyscale map.
The last thing we need to do before we export the map is to resize it to 1:1 pixel mapping. On the map windows toolbar you will see the zoom and un-zoom buttons, between them is a button with a 1 in a magnifying glass, click this button and MicroDEM will the resize the map.
To export the map we need to save it as a GeoTIFF file, click on 'File->Save Map as Image->As GeoTIFF, Screen Scale (Greyscale)'. Locate the folder where you want to place the image file and then select 'Save'.
3rd Step: Photoshop or other image editing software
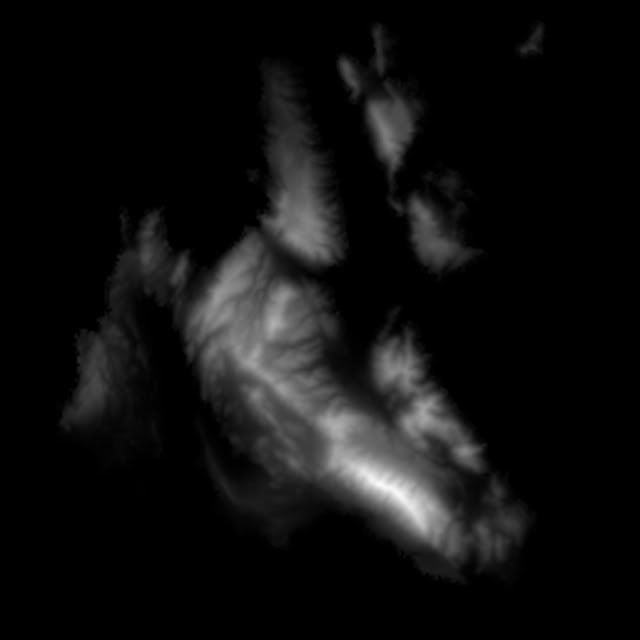
Open up the .TIF file. The first thing we need to do is make sure the map is square, in photoshop the easiest way to do this is to use the crop tool and select a 1 x 1 crop. Now we need to convert the map from 8-bit to 16-bit (if we didn't convert the map CAW would duplicate the map and create 2 islands instead of the one), select 'Image->Mode->16 Bits/Channel'.
Next we need to resize the map to the size that is required by CAW, remember that CAW has different size requirements for different size maps (Small map = 512 x 512, Medium = 1024 x 1024 and Large = 2048 x 2048). In photoshop select 'Image->Image Size...' and then enter the required dimensions and then click OK, in this example I am using 1024 x 1024.
Finally we need to save the image as a .PNG file so that CAW can read it, select 'File->Save As...', browse to the CAW Map folder (my folder is located at - Documents\Electronic Arts\The Sims 3 Create A World Tool\UserToolData\HeightMaps), enter the name for the map in 'File Name' and then make sure the 'File Format' is PNG(*.PNG) and then click Save and then click OK in the pop-up box.
That's the Height Map created all we need to do now is open up CAW, create a new world and select the Height Map we just created and your new world should appear as if by magic ;)
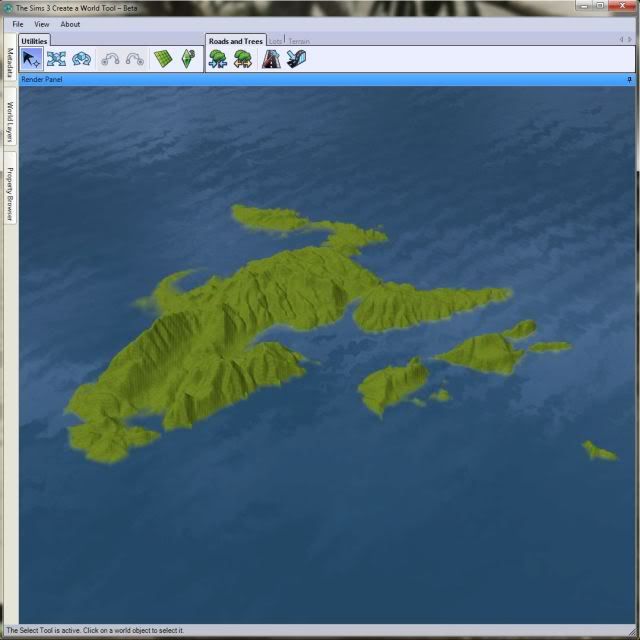
All the world will need is a little bit of smoothing to get rid of the ripples and then you can create your world however you would like.
Hope this helps some of you creative guys and any Comments or questions are welcome.
Nathan
Edited for spelling
To get started you will need the following:
* Google Earth (http://earth.google.com)
* MicroDem (http://www.usna.edu/Users/oceano/pguth/website/microdem/microdem.htm)
* SRTM Overlay for GoogleEarth (Run from URL once you've installed Google Earth - http://www.ambiotek.com/topoview).
* A graphics program, such as Photoshop, Paintshop Pro, etc.. to covert a TIF to PNG. I will primarily be using Photoshop in this tutorial.
OK, before we start, make sure you've installed Google Earth, the SRTM Overlay & Microdem.
1st Step: Google Earth
The first time you use the SRTM overlay you will need to run the actual file, just double click on the file named srtm41.kmz (or right click and select open), this will load SRTM into Google Earth and place it in your 'Temporary Places' within the Places categories list. Put a tick in the option marked 'Elevation' under the STRM4.1 Category and you should see a load of boxes appear over the globe, each with a green dot in the middle.
Now, locate the area you want to create a height map for, in this example I'm going to use the lovely Greek island of Kefallonia.
Ok, on the pic above you will see the island and part of mainland Greece, you will notice a green triangle towards the right side of the map labelled 'Data for: srtm_41_05', this is the DEM data we require.
Click on the green triangle and you will get a page pop up, scroll that page down until you can see the link 'Click here to visualise terrain and access 1 degree tiles'. Google earth will then split the larger box into smaller boxes and the display will change to a coloured height map view, in the 'Places' category list on the left you will see an additional selection called 'Elevation Preview', click on the plus next to this selection and then place a tick in the 'Global Legend' box (you might need to click twice).
From the Google Earth screen we can now select the relevant data we want to download, click on the small box next to the data you want to download, for example I need to download srtm_41_05_1_4, a pop up box will appear and allow you to download the required file (I have had problems with using the FTP link so I normally select the HTTP one). Once you have downloaded the file you will need to un-ZIP it into C\mapdata\dems, once you have done that you can close Google Earth as you don't need it anymore.
2nd Step: MicroDEM
Open MicroDEM and then click File->Open DEM, in the Files of Type box make sure 'ASCII Arc Grid' is selected, browse to the folder you unzipped the DEM file, select the file and then click Open.
By default you get all the legends and other stuff you don't need, to turn these off. You'll only need to do this the first time, as it remembers these settings. Right click on the map & select 'Legends / Marginalia'. Click on 'Scale Bar' and untick the 'Include on Maps' box. Do the same with the Elevations button. Then click OK to close the Map Marginalia window.
The DEM files that we downloaded are too detailed for what we require so we need to 'thin' them, to do this select Raster GIS->Thin DEM (Decimate), select a Thin Factor of 3 and press ok. We now need to select the area that we want to use, on the toolbar of the Map window (not the main MicroDEM toolbar) you will see a button which has a dotted rectangle with an arrow at the bottom right (9th in from the left). This is the 'Create Subset' button, click it and then click and drag (whilst still holding the mouse button down) across the map area, try to keep the selection as square as possible.
Microdem will automatically zoom into the cropped area. If you made a mistake and cropped off an area you want, simply undo the crop (the crop operation is called a subset), by clicking the 'undo subset' button (to the right of the create subset button).
Next, we need to change the colour map to a greyscale map. Right click on the map and select 'Display Parameter' and then select 'Elevation'. Select the Greyscale option in the list and then click on the Z Range button. The Z Range basically controls how the heights are mapped onto the greyscale colours, the greater the height, the lighter the colour.
I usually leave the default values but if you have a problem with the map in CAW you can try altering the values, especially if the sea level seems wrong you can lower the Min Value to give more depth. Click OK and Ok again and MicroDEM will convert the map into a greyscale map.
The last thing we need to do before we export the map is to resize it to 1:1 pixel mapping. On the map windows toolbar you will see the zoom and un-zoom buttons, between them is a button with a 1 in a magnifying glass, click this button and MicroDEM will the resize the map.
To export the map we need to save it as a GeoTIFF file, click on 'File->Save Map as Image->As GeoTIFF, Screen Scale (Greyscale)'. Locate the folder where you want to place the image file and then select 'Save'.
3rd Step: Photoshop or other image editing software
Open up the .TIF file. The first thing we need to do is make sure the map is square, in photoshop the easiest way to do this is to use the crop tool and select a 1 x 1 crop. Now we need to convert the map from 8-bit to 16-bit (if we didn't convert the map CAW would duplicate the map and create 2 islands instead of the one), select 'Image->Mode->16 Bits/Channel'.
Next we need to resize the map to the size that is required by CAW, remember that CAW has different size requirements for different size maps (Small map = 512 x 512, Medium = 1024 x 1024 and Large = 2048 x 2048). In photoshop select 'Image->Image Size...' and then enter the required dimensions and then click OK, in this example I am using 1024 x 1024.
Finally we need to save the image as a .PNG file so that CAW can read it, select 'File->Save As...', browse to the CAW Map folder (my folder is located at - Documents\Electronic Arts\The Sims 3 Create A World Tool\UserToolData\HeightMaps), enter the name for the map in 'File Name' and then make sure the 'File Format' is PNG(*.PNG) and then click Save and then click OK in the pop-up box.
That's the Height Map created all we need to do now is open up CAW, create a new world and select the Height Map we just created and your new world should appear as if by magic ;)
All the world will need is a little bit of smoothing to get rid of the ripples and then you can create your world however you would like.
Hope this helps some of you creative guys and any Comments or questions are welcome.
Nathan
Edited for spelling

