14 years ago
TUTORIAL :: Adding basements to existing houses with foundation :: No demolishing necessary!
STEP 1:
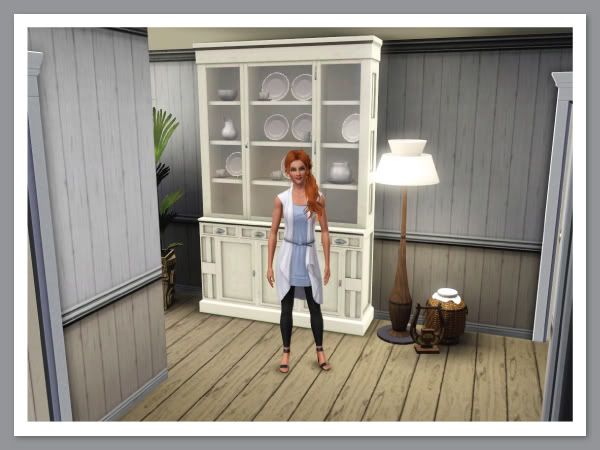
Spartan wants a basement, this looks like a good spot! Unfortunately the house is already built and furnished, but that can be easily fixed. No need to demolish whole parts of the house and swear and cry!
STEP 2:
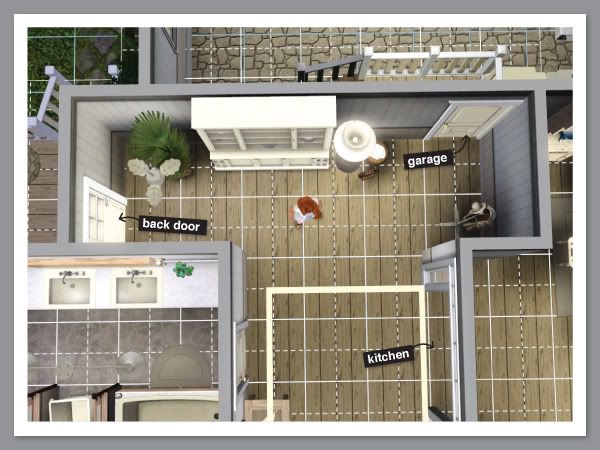
This job may be a bit tricky because it's going through foundation, but there's enough room here, and it's close to the garage, kitchen and back door. Let's go for it!
STEP 3:
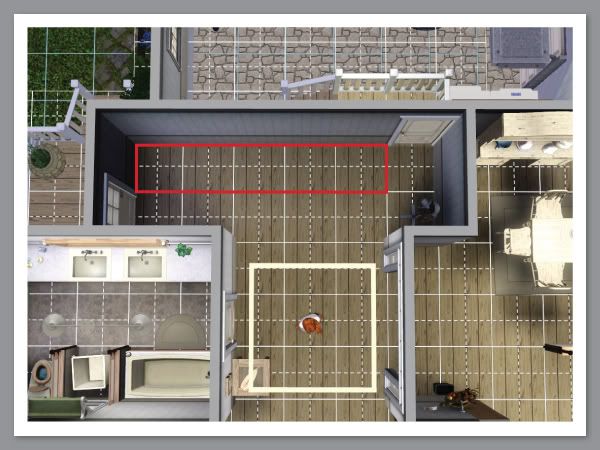
You need to delete 5 squares in the foundation as a minimum, and this is where it's going.
BUT: In some instances you will need 6 squares, eg. if you are building at the edge of the house. I'll show you why later. If you're unsure, do 6 squares.
EDIT: Big dogs need 2 square landings to be able to use basement stairs - you might want to take that into consideration and add yet another square. (thanks hmsdrco2001)
STEP 4:
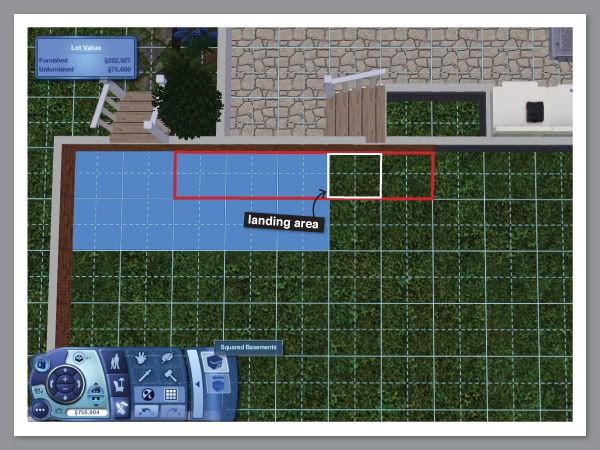
Using the basement tool on ground level, draw it in ready for the stairs. I've again shown where the foundation will be deleted in relation to the basement. The white outline shows where the mid-landing will be.
STEP 5:
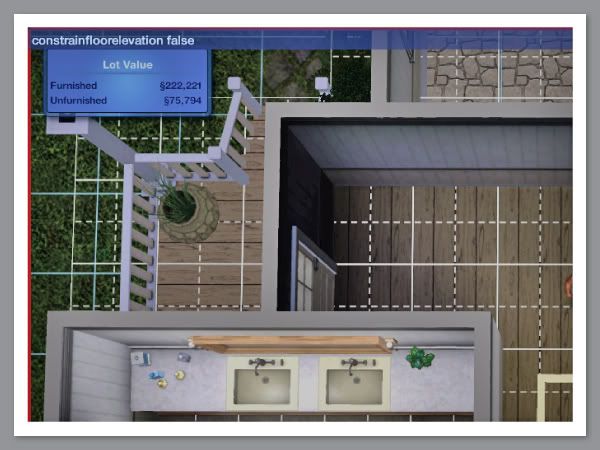
Activate the CFE "constrainfloorelevation false" cheat.
You do this with ctrl+shift+c which brings up the dialogue box shown at the top left. Type it in, and press enter. Move the immediate furniture out of the way. I also moved the door to the garage, and activated the "moveobjects on" cheat to minimise how much furniture I will need to move.
STEP 6:
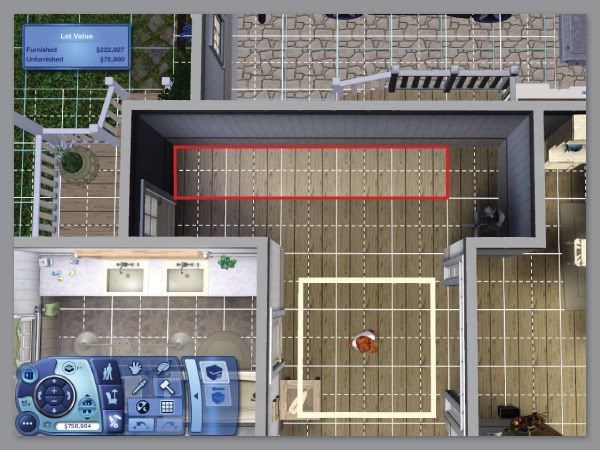
Using the sledgehammer tool, now delete the 5 squares shown in red.
STEP 7:
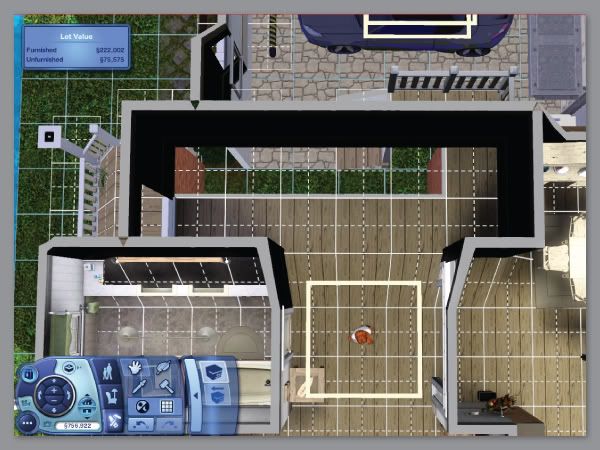
The floor will "pop" up - don't freak out! You want this to happen - it turns the foundation into wall height, which is what you need for the stairs to go through the foundation. It looks a fright, but stay calm.
NOTE: As I have an attached garage, there are a few parts that may look slightly different to yours. Don't worry.
STEP 8:
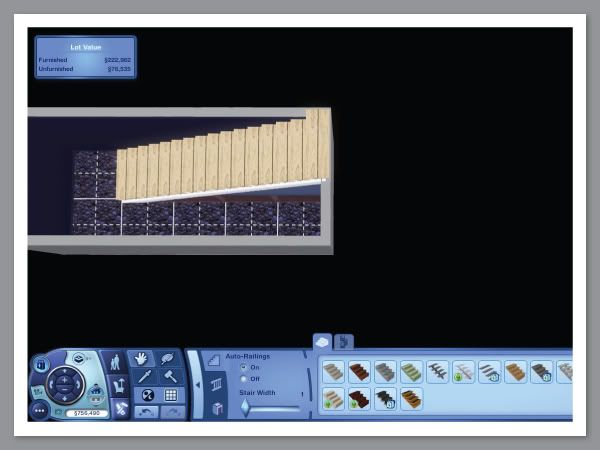
Go down to basement level and place your stairs. It is CRITICAL you choose the stair type you want at this stage, because you will have to re-do the whole process if you haven't chosen the correct one. They can be re-coloured at any time though.
STEP 9:
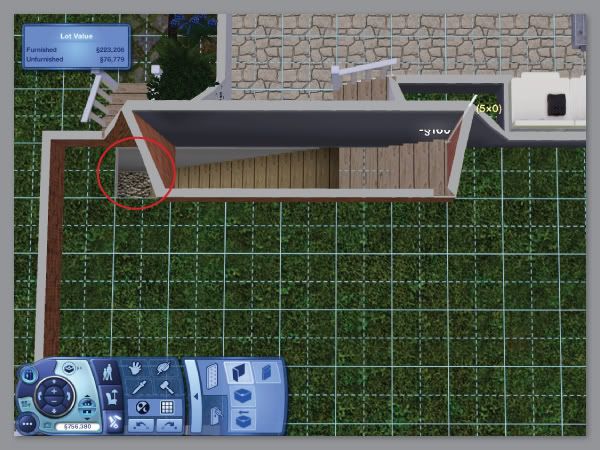
Return to ground height. I've drawn in a wall here as I had an attached garage, but you may not have to because you will probably have foundation showing instead. Skip this if necessary.
RED CIRCLE - remember earlier I told you about needing 6 squares if building on the edge of the house? This shows you why.
You can actually place floor tiles over most of the staircase on the floor above, but it is best to leave at least 3 spaces free as the sim's head will look like it goes through the floor as they walk down the stairs. As it is within my foundation, it won't affect me, but if you built on the edge of your house, you will have needed that extra square.
STEP 10:
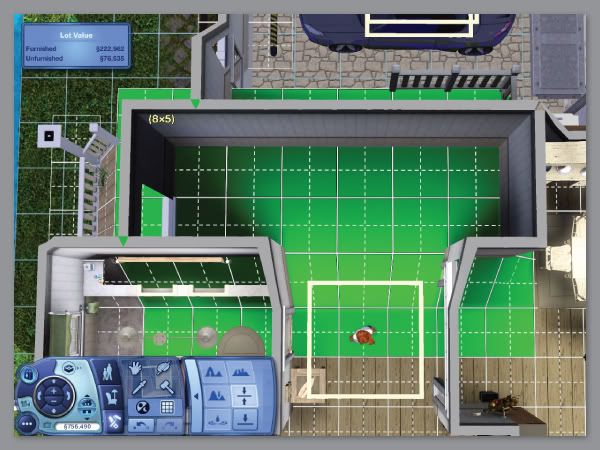
Go to foundation level, select the level tool and draw over the raised section of the floor, making sure to start on an edge area that is the correct floor height. Extend it beyond the immediate raised area, so you don't miss anything.
STEP 11:
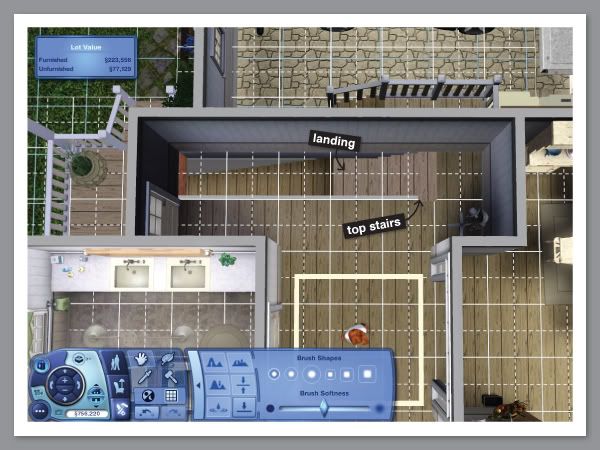
It should look like this. Now place your top stairs and the floor tile for the mid landing.
STEP 12:
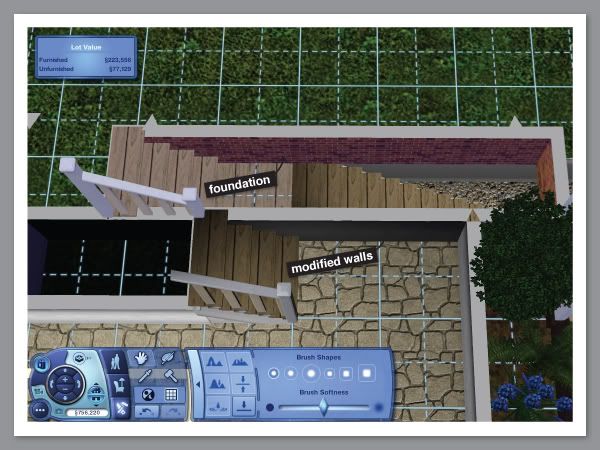
Now to fix the sunken areas lighting glitch. If you don't care about it - skip to step 19.
Notice the foundation areas have the brick pattern, but the piece I drew in to compensate for my attached garage is the usual grey wall colour? You need all walls to be done in the grey due to the lighting glitch.
STEP 13:
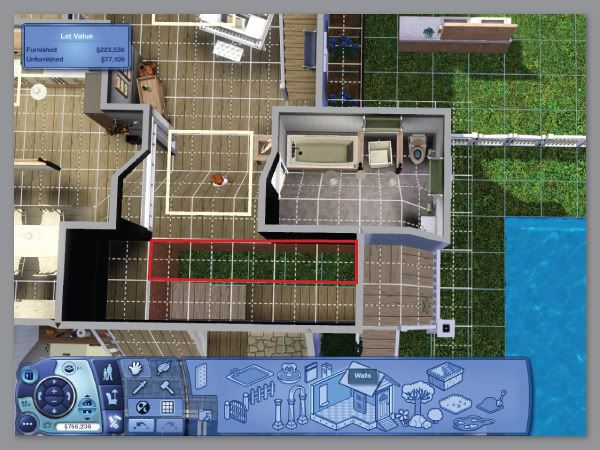
So, delete the 5 foundation squares NEXT to the new stairs. Again it will pop up and look a fright.
NOTE: You may have to move some furniture next to these squares - I had to move the bathroom counters for it to allow me to delete those squares. Counters seem to be affected, but you can see the Sim is fine. Move only what's necessary.
STEP 14:
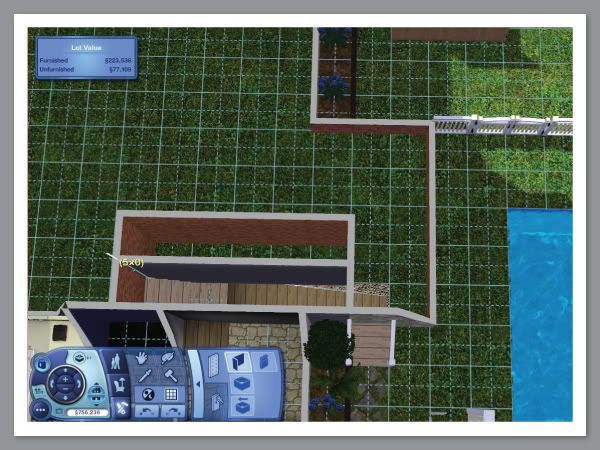
On ground level, using the wall tool, now draw in the wall next to the stairs.
STEP 15:
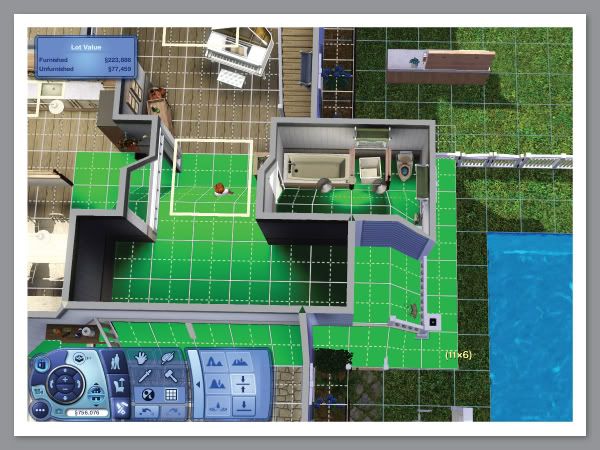
Again, level out the area with the level tool.
STEP 16:
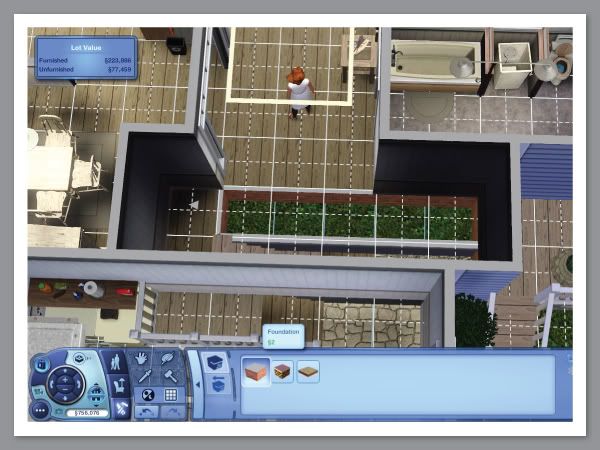
Nice and level now, with the wall at foundation height.
STEP 17:
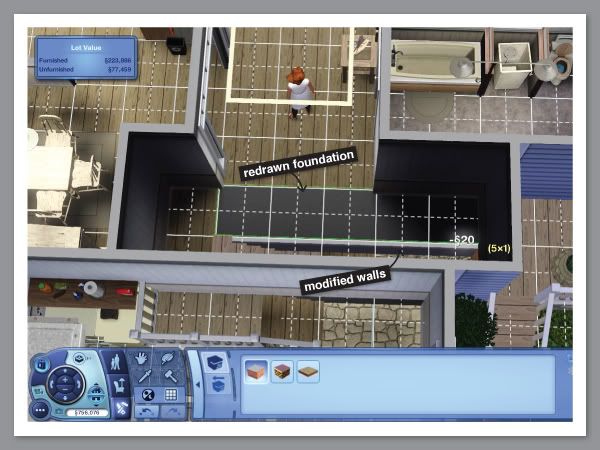
Using the foundation tool, redraw the foundation in the hole - notice that instead of the brick foundation pattern on the edges, you have the grey wall colour. This means you won't get the horrible blue night-time lighting glitch. All sunken areas that get used as interiors should be done this way, otherwise your lighting/colouring will always be off.
STEP 18:
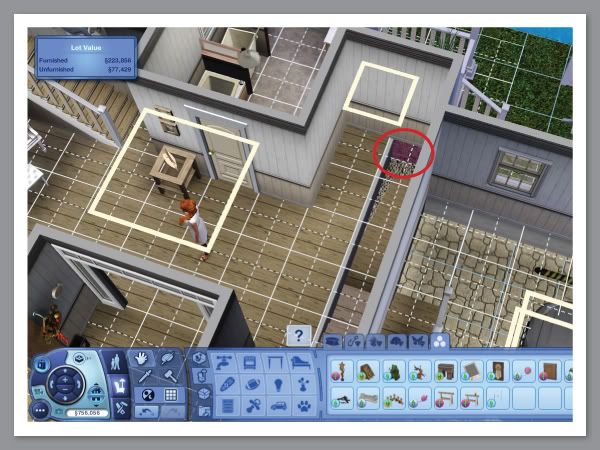
Draw in your floor tiling - but you can see one tile on the end that needs doing too - it still has the brick pattern on the edges. Repeat the previous steps for any foundation that shows brick pattern instead of grey wall.
Step 19:
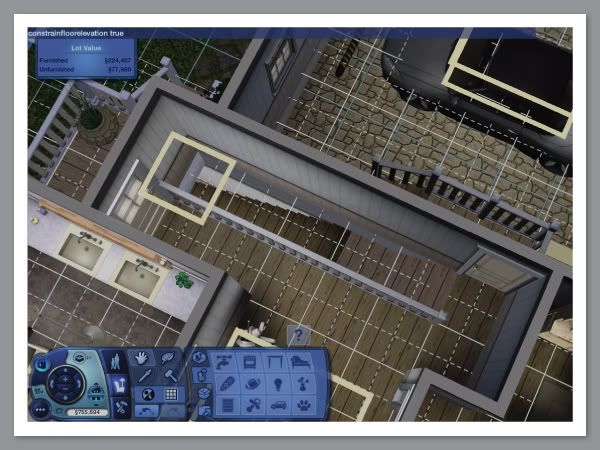
Turn off the CFE cheat with "constrainfloorelevation true" now, and replace all your doors and furniture and paint the walls. You can enlarge the basement at any time now, just don't delete those steps!
STEP 20:
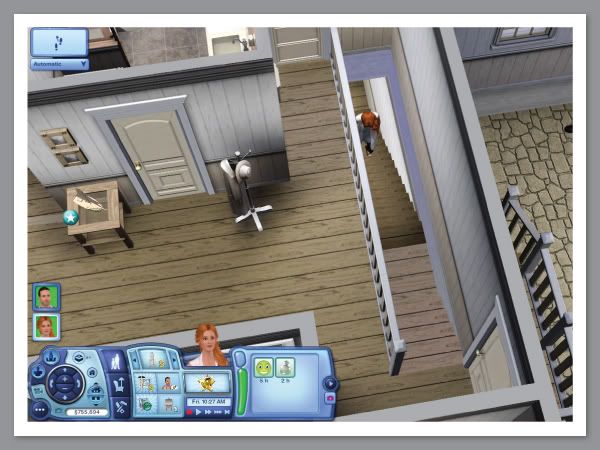
Now test all the stairs and doors - with my version I have the cheat "MoveObjects on" enabled as well so I can place that door to the garage right next to the stairs.
That's it - I hope I helped you, and feel free to ask any questions if anything is unclear!
ONE LAST THING:
If you have used CFE ABOVE the foundation level of your house, you will need to go to those upper levels and level them out as they will have been affected by the CFE process below them. It's likely they will have popped up to "normal" wall height. This will include any friezes you've used.

Spartan wants a basement, this looks like a good spot! Unfortunately the house is already built and furnished, but that can be easily fixed. No need to demolish whole parts of the house and swear and cry!
STEP 2:

This job may be a bit tricky because it's going through foundation, but there's enough room here, and it's close to the garage, kitchen and back door. Let's go for it!
STEP 3:

You need to delete 5 squares in the foundation as a minimum, and this is where it's going.
BUT: In some instances you will need 6 squares, eg. if you are building at the edge of the house. I'll show you why later. If you're unsure, do 6 squares.
EDIT: Big dogs need 2 square landings to be able to use basement stairs - you might want to take that into consideration and add yet another square. (thanks hmsdrco2001)
STEP 4:

Using the basement tool on ground level, draw it in ready for the stairs. I've again shown where the foundation will be deleted in relation to the basement. The white outline shows where the mid-landing will be.
STEP 5:

Activate the CFE "constrainfloorelevation false" cheat.
You do this with ctrl+shift+c which brings up the dialogue box shown at the top left. Type it in, and press enter. Move the immediate furniture out of the way. I also moved the door to the garage, and activated the "moveobjects on" cheat to minimise how much furniture I will need to move.
STEP 6:

Using the sledgehammer tool, now delete the 5 squares shown in red.
STEP 7:

The floor will "pop" up - don't freak out! You want this to happen - it turns the foundation into wall height, which is what you need for the stairs to go through the foundation. It looks a fright, but stay calm.
NOTE: As I have an attached garage, there are a few parts that may look slightly different to yours. Don't worry.
STEP 8:

Go down to basement level and place your stairs. It is CRITICAL you choose the stair type you want at this stage, because you will have to re-do the whole process if you haven't chosen the correct one. They can be re-coloured at any time though.
STEP 9:

Return to ground height. I've drawn in a wall here as I had an attached garage, but you may not have to because you will probably have foundation showing instead. Skip this if necessary.
RED CIRCLE - remember earlier I told you about needing 6 squares if building on the edge of the house? This shows you why.
You can actually place floor tiles over most of the staircase on the floor above, but it is best to leave at least 3 spaces free as the sim's head will look like it goes through the floor as they walk down the stairs. As it is within my foundation, it won't affect me, but if you built on the edge of your house, you will have needed that extra square.
STEP 10:

Go to foundation level, select the level tool and draw over the raised section of the floor, making sure to start on an edge area that is the correct floor height. Extend it beyond the immediate raised area, so you don't miss anything.
STEP 11:

It should look like this. Now place your top stairs and the floor tile for the mid landing.
STEP 12:

Now to fix the sunken areas lighting glitch. If you don't care about it - skip to step 19.
Notice the foundation areas have the brick pattern, but the piece I drew in to compensate for my attached garage is the usual grey wall colour? You need all walls to be done in the grey due to the lighting glitch.
STEP 13:

So, delete the 5 foundation squares NEXT to the new stairs. Again it will pop up and look a fright.
NOTE: You may have to move some furniture next to these squares - I had to move the bathroom counters for it to allow me to delete those squares. Counters seem to be affected, but you can see the Sim is fine. Move only what's necessary.
STEP 14:

On ground level, using the wall tool, now draw in the wall next to the stairs.
STEP 15:

Again, level out the area with the level tool.
STEP 16:

Nice and level now, with the wall at foundation height.
STEP 17:

Using the foundation tool, redraw the foundation in the hole - notice that instead of the brick foundation pattern on the edges, you have the grey wall colour. This means you won't get the horrible blue night-time lighting glitch. All sunken areas that get used as interiors should be done this way, otherwise your lighting/colouring will always be off.
STEP 18:

Draw in your floor tiling - but you can see one tile on the end that needs doing too - it still has the brick pattern on the edges. Repeat the previous steps for any foundation that shows brick pattern instead of grey wall.
Step 19:

Turn off the CFE cheat with "constrainfloorelevation true" now, and replace all your doors and furniture and paint the walls. You can enlarge the basement at any time now, just don't delete those steps!
STEP 20:

Now test all the stairs and doors - with my version I have the cheat "MoveObjects on" enabled as well so I can place that door to the garage right next to the stairs.
That's it - I hope I helped you, and feel free to ask any questions if anything is unclear!
ONE LAST THING:
If you have used CFE ABOVE the foundation level of your house, you will need to go to those upper levels and level them out as they will have been affected by the CFE process below them. It's likely they will have popped up to "normal" wall height. This will include any friezes you've used.